Pages

Tuesday, July 30, 2013

Lucky Charm Treats


I actually made these treats awhile back, in fact way back in March. They seemed perfect for St Patty's day. For some reason St Patty's Day is one of my favorite holidays. I don't know if its wearing green, eating and drinking green food or the chasing of leprechauns that is the most fun. Well maybe everyone doesn't chase leprechauns like we do :)

For the past two years we have done a scavenger hunt for my nieces on St Patty's Day. They are given clues that they have to follow that will eventually get them to the pot of gold. At each stop there is a small treat: socks, a green cup, some dollar coins etc. Of coarse since leprechauns are so tricky they always get away. Silly leprechauns.

This past weekend was a big one for Christmas in July. A lot of local campgrounds and tourist places did a Christmas party. If you have kids and were looking for some fun entertainment, why not do a scavenger hunt with them. Could be fun... I don't see why leprechauns couldn't come out in July. Seems like they would want something to do :) You could even make these treats. Since they are so magically delicious.

Once again I just made a 9X9 pan of the treats, but if you have a bigger crowd then go ahead and double the recipe for a 9X13 pan. 

Ingredients:

3 cups of lucky charms cereal
1/2 cup of white chocolate chips
2 Tbsp unsalted butter
1/2 bag of 10.5 oz marshmallows + 1/2 cup

Spray your 9X9 pan with non stick spray.

It is always good to be prepared for no bake recipes, so in a medium size bowl measure out your cereal and the white chocolate chips, mix them so they are evenly combined.

In a large saucepan melt the butter over low heat. Add the marshmallows and mix them unitl they are almost completely melted into the butter. There may be a few large bits of marshmallow left and that is ok.

Take the mixture off the heat and add the cereal and white chocolate chip mixture. Make sure that the cereal is fully coated and combined well.

Pour the cereal mixture into your prepared pan. Gently press down the cereal so that it is even in the pan. You can spray your hands to do this or use a spatula that is sprayed.

Let sit for 2 hours, and then cut for the number of servings that you want. 

Have a lucky charm treat and enjoy!


This recipe originally appeared on sally's baking addiction.

Sunday, July 28, 2013

Reese Puff Treats


 Its funny how things can happen when you try to plan. I was going through my list of blog ideas and I was thinking that it was going to be really hot at the end of July.. and everyone would be ready for non baking recipes. It is now the end of July and its in the low 60s. So it is not exactly overly warm. In fact it has pretty much become a bum weekend for us, catching up on some netflix shows since its too cold to do a lot of our favorite summer activities.

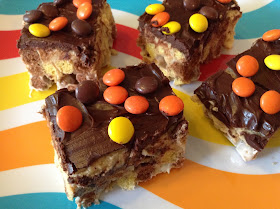
While we were watching shows yesterday I made the last recipe for this week. I have to admit that these meet all expectations. The mixture of the different layers of chocolate and peanut butter with crunchiness of the cereal is perfection. Plus it has reese pieces on the top, and they are on my favorite candy list for sure. So these cereal bars are now on the top of my list for awesome fun recipes.

 So you are probably wondering what the theme of this week is well its "No Bake Cereal Bar" week aka "Anti Rice Krispie" week. There is nothing wrong with rice krispies.... in fact there are a lot of fun rice krispie recipes out on the web and there are more than one that I want to try. Even though they are great... sometimes you need something different to try. So that is what this week is about, trying something different. 

 Ingredients:

First Cereal Layer
1/8 cup butter
1/2 a bag of miniature marshmallows (5.25 oz)
4 cups Reese Puff Cereal

Second Peanut Butter Layer
1/4 cup butter
1/4 cup peanut butter
1 cup powdered sugar
1 tsp milk

Third Chocolate Layer
1/2 cup semi sweet chocolate chips
1/8 cup butter
reese pieces candies for topping

Spray 9X9 pan with butter. In large microwave safe bowl melt the 1/8 cup of butter it should take 30 - 45 seconds to melt. Add the marshmallows mix until they are covered with butter. Microwave uncovered for 30 seconds. Marshmallows should be mostly melted. Stir until they are completely smooth. Add the cereal, mix until fully coated. Press cereal mixture into the bottom of the 9X9 pan.


For the start of the peanut butter layer, soften the butter. About 10 -15 seconds in the microwave will work. Add in the peanut butter, powdered sugar, and milk to the bowl. Mix until it is smooth. Spread the peanut butter mixture over the cereal.


For the last layer put the butter and chocolate chips in a small microwave safe bowl. Microwave for 30 to 60 seconds. Stir the mixture until it is smooth. Spread over the peanut butter layer and sprinkle with Reese pieces.


Put in the fridge for 30 minutes so that the bars can cool.
Cut into pieces and enjoy!


This recipe was modified from a recipe on the bettycrocker website.

If you enjoy this recipe then you may enjoy these as well.

Peanut Butter Crunch Bonbons


Peanut Butter Swirl Cookies


Thursday, July 25, 2013

Blueberry Banana Smoothies


Did you know that if you only use say 9 out of say 12 of the muffin cups in a muffin pan.. and don't fill the others with water, then your muffins are more likely to overcook? Yup, its true. I have personal experience on this matter. I have this great blueberry muffin recipe I was going to share with you. I have used it several times before and have never had issues with it.

Yesterday I cut it in half, because it would still make 9 muffins. Plenty for Jim and I to enjoy and some to share. But I didn't know the water trick and they were a little toasty. They still tasted good. Jim and I enjoyed them for a dessert last night for dinner... and Ginny tried a couple.

Yes I am awful and feed baked goods to my dog. Don't worry though she is very fit, and gets multiple walks daily. So even though they still tasted good there was no way I was going to take pictures of them and put them on the blog. Seriously I'm trying to get a following here :)

So I was going to remake them today... but Jim gave me a look that said enough with the blueberries...hmmmm.... So I have been having smoothies like crazy for breakfast lately. I buy bananas and let them ripen so I can freeze them for smoothies. Its quick easy and healthy. Well healthier than other things I would snack on  anyways.

So I decided to make a blueberry banana smoothie for you... and luckily it turned out great and yummy... and like all smoothies relatively easy. In fact I'm enjoying it right now... Nothing like a last minute post.

Ingredients:

2.5 frozen bananas (2 or 3 would work, all of my freezing conatiners fit 2.5 nicely so that works for me)
1 cup fresh blueberries
1 5.3 oz container of greek yogart
1/2 cup milk
1 tsp honey

Add all the ingredients to the blender at once.
This is a picture of just the bananas and blueberries. Yummy, healthy goodness.


Once all the ingredients are in there puree till all the bananas are chopped up. Pour and enjoy!

If you enjoy this recipe, you may also like Peanut Butter Banana Bomb Smoothie.

Tuesday, July 23, 2013

One Minute Blueberry Cobbler


Last week was roasting here in Michigan. I had to take poor Ginny on walks either really early in the morning or late at night or she would die of exhaustion. I really think she is part Husky or some other snow dog. The snow doesn't bother her a bit, but if the temperature gets over 75 she just about dies when we take our neighborhood walk. Jim thinks this means we should move to Alaska... it just confirms to me that she is lucky to live in Michigan. 

The heat has died somewhat in Michigan down to the 70s compared to the roasting temperatures we had last week. Even though the temps are down sometimes you just don't feel like turning on the oven or spending lots of time in the kitchen in the summer.

So this recipe is for everyone out there that wants to avoid the kitchen in the summer...but still wants a yummy summer dessert. It it down and dirty fast, a little messy and oh so yummy.

This recipe is for one... I just doubled everything to make two. I thought it would be a little rude to eat it in front of Jim without giving him any... and I ofcoarse need to test everything that goes on the blog. 

Ingredients:

1/4 cup flour
2 tsp sugar
1/4 tsp baking powder
pinch of salt
2 Tbsp milk
2 tsp unsalted butter, melted
1/2 cup fresh blueberries

Mix together the following ingredients: flour, sugar, baking powder, and salt until well mixed. Add the milk and melted butter, and mix with a fork until just combined.

Place the blueberries in the bottom of a large (6-8 oz) microwave safe ramekin.


Spoon batter over the blueberries.


Important: Place on top of a microwave safe plate, because the blueberries will boil over. As I said this is a fast and messy recipe :) Microwave for 30 seconds on high. Then check cobbler. Microwave another 30 seconds, and you are done.

See why you need the plate....


We topped ours with whipped cream, but you could also do ice cream. I'm sure it would be good plain as well.

Lastly eat and enjoy!

This recipe orginally appeared on the snappy gourmet.

Sunday, July 21, 2013

Blueberry Thing


If you have ever stayed at my parents house for any reason then you have probably tasted blueberry thing.  It is one of my favorite dishes that my mom makes, and for good reason because its absolutely delicious. So for almost any holiday we will have blueberry thing and homemade cinnamon rolls.. or if we are lucky both.

Blueberry thing isn't really a thing but its a coffeecake. When I was younger, my sister and I both worked at a farmers market. At the end of the day we would very often go home with extra fruits and veggies that hadn't sold that day. So in return my mom would send us back with homemade treats. Blueberry thing was named and loved by the owner Tony. He wasn't a huge talker but every once in a while he would be like when are you going to bring that blueberry thing back in. It was a sure sign he really wanted some when he send us home specifically with blueberries :)

July is national blueberry month... and they are just starting to come out in full force around me in Michigan. So I thought it was appropriate to make this blueberry week. Two of the recipes including this one are old favorites, and I found a new one that I think everyone will be super excited to try.

So here it goes from the vaults of my mothers recipe book... Blueberry Thing. I backed mine in a 9X9 pan since it was just Jim and I. I also have to admit I made it last night, and it is already gone... Yup... late night snack... Early Breakfast... and right before Church breakfast....

If you have a larger crowd, then I would double the recipe and do it in a 9X13 pan. That is how it was always served in my house :)

Ingredients:

Base:
3/4 cup sugar
1/3 cup melted butter
1 egg
1/2 cup milk
1 cup flour
1 tsp baking powder
1/2 tsp salt

Topping:
1/8 cup sugar
1/4 tsp cinnamon
3/4 cup blueberries

Glaze

1/4 cup powered sugar
2 capfuls of milk (yes capfuls is an actual measurement).

Mix together the sugar and melted butter. Add the egg and milk and combine until well mixed. You can do this by hand and don't need a stand mixer. Add the flour, baking powder, and salt. Mix until fully combined. Put in a greased and floured 9X9 pan. You can also do a round cake pan.

Wash the blueberries and mostly dry them. Cover with flour so that that they don't sink when they bake. Cover the top of the base with the blueberries.

In a small bowl mix together the sugar and Cinnamon. Sprinkle over the top of the berries. Bake at 325 for 40 minutes.

Wait for the base to cool, then cover with the glaze. For the glaze put the powdered sugar in a small bowl and add the milk one capful at a time. It took me two capfuls to get the texture that I wanted. You want it so its still thick but easy to drizzle.

Drizzle over the cooled cake.

Cut a piece and enjoy!


This recipe was originally posted on Laura's Baking Talent.

Thursday, July 18, 2013

Chocolate Zucchini Bread


A couple of years ago I was watching my sisters animals while she went on vacation, and her garden was exploding with zucchini. I googled how to freeze zucchini so that you could have it all year long. I loved to make zucchini bread so I thought it would be great to have lots of free zucchini in the freezer. I spent a whole day shredding zucchini and freezing it in little bags.

I have to admit I only used one bag of the frozen zucchini, the rest is still in the freezer isn't that sad. It just proves that zucchini is for the summer and not the rest of the year :)
 
Back to the last recipe for zucchini week, you know that I love my chocolate. So I had to find a way to get some chocolate into zucchini week. I saw this recipe and had to give it a try. I am glad that I did because it was really good.

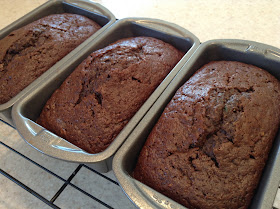
I made three mini loaves again, so that we could freeze some. It was so good that we almost ate one mini loaf in one sitting. So maybe I didn't have to worry about that.

Ingredients

2 large eggs
1/3 cup honey
1/2 cup vegetable oil
1/2 cup brown sugar
1 tsp vanilla 
1 tsp salt
1/2 tsp baking soda
1/2 tsp baking powder
1/3 cup cocoa
1 2/3 cups flour
2 cups shredded zucchini
1 cup chocolate chips

Preheat the oven to 350 deg. Grease the pan. You can use a full loaf pan or three mini pans, your choice. I had trouble getting the bottom of one of my loaves out of the pan because of the melted chocolate chips. If you have parchment paper, you may want to line the bottom of the pan with it. The sides should be fine as long as you grease the pan.

In a large bowl, mix together the eggs, honey, vegetable oil, sugar, and vanilla until it is smooth. Add the salt, baking soda, baking powder, cocoa, and flour. Mix until well combined.

Stir in the zucchini and the chocolate chips.  Pour into the prepared pan or pans.

If you do a full loaf bake for 65 - 75 minutes. If you do the mini loaves it will be about 45 minutes. Cook until a toothpick comes out clean.

Let the pans cool for 15 minutes and then remove.


Cut a piece and enjoy. Have one when its still warm, its so worth it.


This recipe was originally on the King Arthur Flour website

.

Tuesday, July 16, 2013

Grilled Zucchini and Summer Squash


In the summer we love to grill out. We love to do burgers, hotdogs, kabobs, chicken, steak. So its great food and lucky for me Jim does all grilling :) One of our favorite sides to do with the main dish is grilled zucchini and summer squash.

This recipe is easy, yummy and healthy for you. It also once again gives you something to do with all of that left over zucchini and summer squash.

Ingredients:

1 summer squash
1 zucchini
black pepper
salt
cooking spray

Cut the zucchini and summer squash into 1/4 inch circles. Put on a piece of foil and sprinkle with black pepper and salt. Spray with cooking spray.

Place on the grill uncovered. Cook on medium low heat (325) for about 6 minutes. Flip the zucchini and summer squash and spray with cooking spray again. Cook for another 6 minutes.

Serve warm with your main dish.

Sunday, July 14, 2013

Zucchini Cups


So summer is in full swing.. which means warm weather, trips to the beach, and lots of zucchini.  I figured that everyone could use some new zucchini recipes. So its officially zucchini week.

I love to watch reality tv shows. Especially reality shows that involve cooking. I was addicted to the first season of Masterchef. I watched every week and routed for Whitney Miller the whole time. She always had unique recipes and loved baking as much as I do. When her cookbook came out I had to get it right away.

This recipe for Zucchini Cups is one of my favorites from her book.

Ingredients:

4 medium zucchini
1 Tbsp extra- virgin olive oil
1/8 tsp salt
1/8 tsp black pepper
1 1/4 cups chicken broth (1/2 + 1/8 cups)
1/4 cup diced yellow onions
2 1/2 Tbsp unsalted butter
1/2 tsp crushed garlic
1/8 tsp ground white pepper
2 large egg, beaten
3 Tbsp stuffing
1 Tbsp grated Parmesan cheese

Preheat the oven to 375 deg F.

Slice off the bottom rounded portion of each zucchini so that it will stand up on the baking sheet. Measure 2-3 inches from the bottom and cut. Repeat this until you get about 4 pieces from each zucchini. Use a 1/2 teaspoon or a melon baller to scoop out the center of the zucchini to make the cups. Leave a thin layer of zucchini at the bottom of each cup.  Save the inside of the zucchini for the rest of the recipe.


Place the cups on a baking sheet. Coat the outside of the cups with the olive oil. Season with the salt and black pepper. Back for 17 minutes. Remove from oven and reduce the temperature to 350 F.

While the cups are baking. Bring the chicken broth to a boil over medium - high heat. Peel any remaining zucchini pulp off of the top and trim of the stem ends. You want to get as much of the inside zucchini that you can. Cut the zucchini into 1 inch cubes and measure out 2 1/2 cups. Add the zucchini cups and onion to the boiling broth. Cook until zucchini is soft, it will take about 8 minutes.

Drain the zucchini mixture and return the vegetables to the pan. Using a potato masher, mash the mixture. Add a 1 Tbsp of butter, the garlic, and white pepper. Stir until well mixed. Stir in the eggs. Once the egg is mixed in fill the zucchini cups with the zucchini mixture. Bake until the mixture is set, about 15 minutes.

While they are baking, melt the remaining 1 1/2 Tbsp butter in a small skillet over medium heat. Stir in the stuffing and cook for one minute. Remove from the heat and stir in the Parmesan cheese.

Spoon the breadcrumbs on each zucchini cup. Bake until the stuffing is golden brown, about 15 minutes.

These should be served hot.

This recipe comes from the cookbook Modern Hospitality: Simple Recipes with Southern Charm .

Thursday, July 11, 2013

Rasberry Streusel Bars


I had made the muffins, and then the raspberry chocolate cookies both of which were amazing. I then had the left over raspberries in the fridge to make the last of the three recipes. I knew I was going to make these bars, because they seemed to me to be the perfect raspberry dessert recipe. However I couldn't actually get the ambition to make them. Perhaps it was combined with the fact that it was the 4th of July and I was remaking firecracker cakes like a mad women.

I knew I had to make this recipe though and every day, and perhaps more than once a day. I would take a look in the fridge and check on my left over raspberries. Hey raspberries.. still there... still not going bad... yup someday soon I'm going to use you. Yes I did talk to raspberries.

I then made these bars late this previous week.. basically the latest I could with a guarantee that I could even make raspberry week happen. They were relatively easy to make and they were AMAZING! I was thinking why did I not make these before. These are fantastic... they don't even need chocolate to be amazing.

So I recommend that you don't procrastinate like me.. and you try this recipe right away.

Ingredients:

2½ cups flour
2/3 cup sugar
½ tsp salt
1 cup plus 2 tablespoons unsalted butter (this is divided into two parts of the recipe)
¼ cup light brown sugar
½ cup old-fashioned rolled oats
½ cup pecans, chopped
¾ cup raspberry preserves
¾ cup fresh raspberries
1 Tbsp lemon juice

Preheat the oven to 375 degrees. Line a 9X13 pan with foil and spray with non stick cooking spray.

Process the flour, sugar, and salt in a food processor until combined well, about 4-5 pulses. Place the 1 cup of butter cut into 1/2 inch pieces around the flour mixture in the food processor. Pulse until the butter is mixed well together but the dough is not clumping together, about 20 pulses.

Measure 1 1/4 cup of the mixture and set aside into a medium sized bowl. Press the remaining flour mixture evenly into the 9X13 pan. Bake for 14-18 minutes, until edges turn brown.

While the crust is baking, add brown sugar, rolled oats, and pecans to the flour mixture that you set aside previously.  Combine it well and then add the remaining 2 Tbsp of butter by rubbing it into the mixture with your fingers. Allow the streusel to clump some.

In a separate bowl combine the preserves, raspberries and lemon juice. Mash with a fork until combined but some berry pieces remain.

When the crust comes out of the oven. Spread the raspberry filling over the hot crust. Then evenly spread the streusel over the filling. Do not press the streusel down. Bake for 22-25 minutes, the crust will be golden brown and the filling bubbly.

Let cool for 1-2 hours on a wire rack. This last direction may be the hardest to follow :)
Cut a piece and enjoy. If you have whipped cream it makes it even better.


This recipe originally appeared on the brown eyed baker website. 

Tuesday, July 9, 2013

Chocolate Raspberry Cookies


I grew up with lots of chocolate desserts. In fact there was probably a large portion of my life where it wasn't a dessert unless it had chocolate in some form. My husband however grew up with less chocolate desserts. So Jim loves it when I try fruitier non chocolate desserts. I'm sure as soon a he heard about raspberry week he was excited. However I found a recipe for raspberry week that has even more chocolate than a normal chocolate dessert :)

I saw lots of recipes that combined raspberries and chocolate chips in some form. I actually even made one and decided that I didn't like it enough to include in the blog. I saw this recipe though and knew it had had to be tried and it just had to be good.

These cookies are super chocolatey, it is the first chocolate cookie recipe I've seen that uses cocoa as its only form of chocolate. Other ones usually have you melt some form of solid chocolate whether in bar or chip form. I don't know if its the cocoa or the raspberries that bring out the chocolate flavor, but they are amazing. I do have to admit there is not a huge raspberry flavor to the cookie, it is just an after taste, but they are still amazing... and you need the raspberries in there to make them amazing.

Ingredients:
1/4 cup fresh raspberries (3 tsp of puree)
1 cup unsalted butter, softened
1 cup sugar
3/4 cup light brown sugar
2 large eggs 1 3/4 cups flour
1 1/4 cups unsweetened cocoa powder
1 tsp baking soda
1 tsp baking powder
1/2 tsp salt
1 cup of sugar (for rolling)

Preheat the oven to 350F and line two cookie sheets with parchment paper.
Process the 1/4 cup fresh raspberries in a food processor until they are a puree. It will be a little over 3 tsp of puree. If you have a strainer small enough then strain to get the rasp seeds out of the puree. I did not have one, and went on without straining. If you do not have a food processor you could also use a blender. 

Mix together the butter and sugars until fluffy and creamy.  Add the eggs and raspberry puree. Mix until well combined.

In a medium bowl mix together the dry ingredients: flour, cocoa powder, baking soda, baking powder and salt. Add about half of the dry ingredients to the butter mixture. Once fully combined add the remaining dry ingredients to the bowl and mix again until fully combined.

Put some sugar in a separate bowl. Roll the dough into an 1 1/2 inch size ball and roll in the sugar. Continue to do this till you have 12 on a cookie sheet. Take a small glass and cover the bottom with butter and cover with sugar from the sugar bowl.  Use this to press the cookies flat till they are about 3/4 inches thick. Bake for  8-10 minutes.

Let the cookies cool for 5 minutes on the cookie sheet before transferring to a cookie sheet. You will get about 2 dozen cookies and can store them at room temperature in an airtight container.

Have a cookie and enjoy!


This recipe was originally on Sweet Pea's Kitchen


Sunday, July 7, 2013

Raspberry Streusel Muffins


Raspberries are just starting to ripen up around here. I was driving to the grocery store and saw the cutest little stand that was selling raspberries. One of the things that I love about our area are the little fruit stands that are found on country roads. There is something refreshing knowing that what you are eating was grown locally. Plus a lot of them have these cute little cans where you just leave your payment. It reminds you that there are still trusting and honest people in the world.

I saw this stand and it reminded me of these raspberry muffins that I made last summer. I knew I had to remake the recipe and share it on the blog. It also lead to raspberry week, which lead to some really good recipes that I had never tried before, new recipes that turn out great are definitely a good thing.

So I highly recommend grabbing some raspberries and trying this yummy muffin recipe.

Ingredients for Muffins:
1/2 cup butter or margarine, softened
1/2 cup sugar
1 egg
1/2 cup sour cream
1/2 cup milk
1 tsp vanilla extract
2 cups flour
1/2 tsp baking powder
1/2 tsp baking soda
1/2 tsp ground cinnamon
1/4 tsp salt
1 cup fresh or frozen raspberries

Streusel:
1/4 cup flour
1/4 cup quick cooking oats
3 Tbsp sugar
1/4 tsp ground cinnamon
1/8 tsp salt
3 Tbsp cold butter or margarine

In a mixing bowl cream butter and sugar until fluffy. Then beat in the egg. In  a separate small bowl mix the sour cream, milk, and vanilla. In another bowl combine the dry ingredients: flour, baking powder, baking soda, cinnamon and salt. Stir in part of the dry ingredients into the creamed butter and sugar mixture. Then add some of the sour cream mixture. Alternate adding dry and sour cream mixture into the main batter until it is all combined.  Mix until just moistened.

Gently fold in the raspberries.

Line a muffin pan with paper muffin cups. I use two muffin cups per muffin, because honestly they just turn out better. Fill each cup about two- thirds full.

Now make the streusel. Combine the flour, oats, sugar, cinnamon and salt. Cut in the butter until crumbly. I actually made a half batch of the streusel, and the muffins were still delicious. The first time I made it I did the full thing of streusel, it just depends how sweet you want to the muffins to be. Once you make the streusel sprinkle it over the top of the muffins.

Bake at 400 F for 18 - 22  minutes. Cool in pan for 10 minutes before removing to a wire rack.

Enjoy a fresh muffin.


This recipe was originally posted on the allrecipes site.


Thursday, July 4, 2013

M&M cookies 4th of July Style


Happy 4th of July everyone! I hope that you are all enjoying your day and take time to celebrate with some great food.

This recipe is one of my all time favorite cookie recipes. It is a super simple M&M cookie recipe that you can adapt for any occasion. I have made it so many times I could probably make it in my sleep. You can do easter m&ms, fall m&ms, christmas m&ms, or if you have a graduation party do the colors of the school. So many easy ways to adapt a simple recipe.

I couldn't find red, white and blue m&ms in their own seperate package. I did some research on the M&M site and it appears they had some at one time, but not anymore. So I had to sort for the red and blue m&ms. No big deal.. but it means you have to buy more. We love m&ms to snack on and add to our trail mix.. so no biggie for us. I know you can also buy in bulk at our local grocery store, but I went the other route since I was making a small batch.

Did you know that Frank C Mars came up with the idea of M&Ms from watching soldiers in the Spainish Civil War who were eating chocoloate pellets that had a hard shell of tempered chocolate surrounding the outside. Actual production began in 1941. Mars company partnered with Hershey, since Hershey had control of the rationed chocolate at the time. M&Ms were exclusively for the military during the war.

I didnt know the M&M start up story when I decided to do this recipe for the 4th of July, but I know think its pretty fitting to have them on Independence day! For more M&M history, changes of color and marketing campaigns check out the wikipedia article on them.

Indgreidents:
1 cup brown sugar
1/2 cup white sugar
1 cup shortening
2 eggs
1 1/2 tsp vanilla extract
2 1/2 cups all purpose flour
1 tsp baking soda
1 tsp salt
1 1/2 cups m&ms

Mix together the sugars, shortening, eggs and vanilla until mixed throughly. Mix dry ingredients flour, baking soda, and salt in a seperate bowl. Once mixed add to the sugar mixture. Make sure all the ingredients are combined well. Add in the M&Ms.

Drop the cookies on the sheet in tablespoon balls.

Bake at 350 degs for 9 to 11 minutes.

Have a cookie and enjoy!


This recipe was originally on the allrecipes site.

Follow my blog with Bloglovin

Tuesday, July 2, 2013

Red, White, and Blue Deviled Eggs


The original name for this recipe was Cute Eggs. I got it a local cooking show and it was suppose to be an idea to die eggs for baby showers. So the eggs would be blue and pink.. therefore making them cute eggs. I thought it would be fun to die them for the 4th of July.

It seems like every bbq has deviled eggs, so if you are bringing them to your bbq this year dress them up and make the Patriotic Eggs.

Ingreidents
1/2 dozen hard boiled eggs
1/2 cup mayonaise
1/2 tsp mustard
paprika
Red Food Coloring
Blue Food Coloring
Water

Boil the eggs how you would normally boil your hard boiled eggs. I put mine in a pot with water about 1/2 inch over the top of the eggs. I put it on medium heat and wait for them to come to a boil, and then I set the timer for 25 minutes.

When they are ready. I put them under cold running water from the faucet and start to peel them.
Once you have them peeled cut them half and take out the yellow middles.

In one bowl of water with red food coloring (4-5 drops) put all of the eggs that you want to be red. Put them in the fridge over night to let them soak and become a nice red color.

In another bowl add blue food coloring (2-3 drops) put all the eggs that you want to be blue. Put them in the fridge over night and let them soak.

Store the eggs that you want to be white in the fridge overnight in a covered container.

Mix the yellow parts of the eggs with the mayonaise and mustard, and store in the fridge in another covered container.

In the morning. Remove all the eggs and put them in the plate you want to serve them on. Put the yellow egg mixture in a sandwich bag, cut the corner of the bag and pipe into the eggs. Sprinkle with the paprika (optional).


Take to a bbq and enjoy!