Pages
▼
Wednesday, August 28, 2013
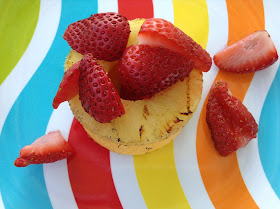
Grilled Pineapple Strawberry Shells
This recipe was suppose to be something different, not completely different but slightly different. It was going to be pineapple, strawberry, pound cake kabobs. We however stopped on the way home from church on Sunday to pick up the ingredients and some hamburgers to grill with them. We were looking at the pound cake that was right next to those dessert shells that you can get.
Two things came to mind. One was that the shells were a third of the price. The second was that it was going to be a lot of pound cake for us to eat before we left on vacation. So guess what Shells won, and we altered the recipe and it turned out wonderful. I would expect nothing less with grill master Jim at my side.
We loved the combination of the grilled warm pineapple and strawberries. I kind of wish that we would have made more :) I have to warn you that the shells get crunchy on the grill. At first we were surprised by this... but then after we had a few bites we decided that we loved that. The crunchy texture with the soft warm fruit is amazing!
I have been thinking so much about vacation that I kind of forgot that labor day was this weekend. Everyone will be having lots of bbqs and grilling during the last few days of summer. So I hope everyone enjoyed all the grilled desserts this week, and hopefully some of you will try them this weekend :) Happy Labor Day Everyone!
Servings: 4 complete shells modify for more (buy the big can of pineapple and cut more strawberries :))
Ingredients
dessert shells - 4
pineapple slices - small can will give you 4 slices
strawberries - 8-10 cut into quarters
Cut three pieces of foil about 12 inches long apiece. Fold the edges like a picture frame to make them a little sturdier when you have to move them.
Cut up the strawberries into quarters, and place them on the foil. Place the pineapple slices on another piece of foil. Place the shells on the last piece of foil.
Set the grill on low heat. Put the shells on indirect heat to start out with. Cook on low heat for about 10 minutes. Then take the pineapples and shells off the foil and grill directly on the grill for about 2 minutes. Turn when you have nice looking grill marks :)
Take off the grill and assemble: shell, pineapple slice, and then strawberries.
This recipe orginally appeared on Laura's Baking Talent.
You may also enjoy:
Traditional Strawberry Shortcake
Spiced Up Campfire Smores
Monday, August 26, 2013
Grilled Banana Boats
So we continued to work on making the office great this past weekend. I put together a white bookshelf that I think looks really nice against the light green walls. I filled it with lots and lots of books that I had laying around. I love to read almost as much if not more than baking. I love classics, fun summer reads, and mysteries. I love picking up copies of books for a dollar. There are a couple of great places around here to do that. I do that a lot before vacation and then I can leave the book for the next person that vacations there :)
We also hung up all the pictures, diplomas etc that were going to go on the walls. The next step is setting up my photography corner. We decided to eliminate one desk we weren't using and some chairs so there is more room. I have a bed in here for Ginny so she can work with me and the windows are open so the cats can look out.
So today's recipe is Grilled Banana Boats. I have to tell you that these are super fun... and really easy to make. They are also really tasty. We made them once.. and a few nights later Jim was like can we do those banana boats again?
They are also healthy for you, because most of the dessert is a banana :) I think that these would be super fun to make with kids at a BBQ.
Ingredients
Bananas (1 per person)
1 Tbsp of chocolate chips per banana
1 Tbsp of peanut butter chips per banana
1 Tbsp of mini marshmallows per banana
Cut 2 pieces of foil about 6-7 inches for each banana.
Take a banana, make sure and leave the peel on it. Cut a slit down the center of the banana with a sharp knife. The slit should go the whole length of the banana. Use the foil to make a boat around the bottom of the banana. Make sure that the boat will stand by itself.
Pry open the slit of the banana. Stuff the center with the chocoloate chips, peanut butter chips, and marshmallows. Put in as many as will fit. The more the better :)
Cover the bananas with the other piece of foil. Leave 2-3 inches of space, because the marshmallows will grow when you grill them.
Put the covered bananas on medium high heat on the grill for 8-10 minutes.
Remove foil and enjoy immediately!
This recipe originally appeared on the betty crocker website.
You may also enjoy
Traditional Banana Split
Sausage Kabobs
Sunday, August 25, 2013
Grilled Bread Pudding
Even though I keep trying to deny it, summer really is coming to an end. My nieces started their first soccer games yesterday. Jim and I went to cheer them on.. and I got a touch of sun. Ginny and I were on our walk the other day and I saw some leaves that were already turning on a maple tree. I actually told the tree to stop. I'm sure it listened.
The stores have also already moved on to Halloween and Fall decorations. One store last week even had Christmas out... way to early for me. Well that's ok.. I love fall. However I have one more big event before I will give up summer.
That is our vacation to Yellowstone National Park. We are super excited to go on our trip and we leave this week :) I have printed out all of the reservations for our hotels and the rental car. Today I plan to lay out my clothes to pack.. plan for the carry on only situation :)
Since going out west is all about being outdoors, hiking, and campfires. I decided to bring that to the blog this week.. and we did grilled desserts. All of these recipes are super easy, fun, and tasty. I also enjoyed them because I got to make them with Jim. I have to admit I haven't ever actually grilled anything on my own before :)
If you have figured out my posting schedule (Sun, Tues, and Thurs) it will change slightly this week to (Sun, Mon, and Weds). Also since we will be gone for about a week there will be no blog posts next week : ( Don't worry I will be back the following week with some more amazing recipes.
Ingredients
2 eggs
1 cup milk
1/2 cup sugar
1/4 tsp cinnamon
4 cups bread cubes (I used french bread)
1 cup berries (I used 1/2 cup blueberries and 1/2 cup raspberries)
In a large bowl add the eggs, milk, sugar and cinnamon. Whisk them till they are mixed up well.
Add the bread cubes and the berries. Stir until all of the bread is coated with the egg mixture. Let soak for 30 minutes. (We took Ginny for a walk during this time)
Spray two large pieces of foil with cooking spray. Put the soaked bread mixture on one piece of foil. Put the other piece over the top and form a foil packet.
Grill on indirect heat for 35 minutes. Turn a few times.
Eat and Enjoy right away!
This recipe originally appeared in the Food Network magazine.
You may also enjoy
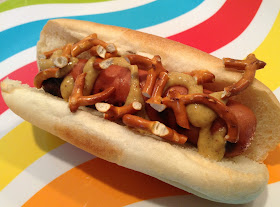
German Pretzel Dogs
Smore Cookie Bar
Thursday, August 22, 2013
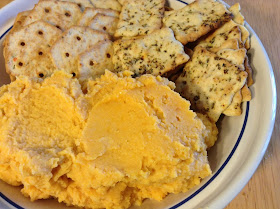
Sweet Potato Hummus
Ok.... Blog readers we almost had an epic emergency.... I did a super clean yesterday and I misplaced the sweet potato hummus recipe. Epic right? How could hummus week continue without the sweet potato hummus. It just wouldn't happen. I kept looking everywhere... going its on the post-it that is the color of a sweet potato... good organization huh :)
Luckily... I found it and I am able to share it with you. I must warn you this is AMAZING hummus... and you know how orange food is suppose to be super good for you. Well sweet potatoes are orange.. so its good and super healthy.
Before I jump into the recipe I have to share my other project of the week. I realize that this is a food blog, but other things of interest are cool too right :)
Remember my beach glass I told you about and how if I mentioned it would spur me to great things... like doing something with it. Well it worked.
See my latest piece of artwork....
I just love the idea of beach glass... It was thrown away... broken from whatever it was part of originally. Then the waves beat on it till it is something quite beautiful. I love finding unique pieces. There is one that we found that had to be part of a plate with a small blue pattern. There are others that have parts of words. Its fun to try to guess the whole word, it can be tricky at times.
Ok enough off my beach glass is awesome kick... and on to the recipe.
Ingredients
1 sweet potato
1 can chickpeas (aka garbanzo beans)
2 tsp olive oil
a pinch of salt
1 Tbsp Tahini
1 garlic clove
3 Tbsp lemon juice
Start out by cutting up the sweet potato. Put it into a pot and fill with water. Put on the stove on medium high heat and get to a boil. Continue to boil the sweet potatoes until they are tender. This will take 15- 20 minutes. While you are waiting for the sweet potatoes chop/crush the garlic clove.
After the sweet potatoes are tender, drain them and rinse them with cold water. This will get their temperature down so that you don't shock your food processor container.
Put the sweet potato in the food processor. Add the remaining ingredients. Order does not matter: chickpeas, olive oil, salt, Tahini, garlic and lemon juice.
Pulse 8-10 times or until you get the texture that you like.
Serve with crackers or fresh vegetables.
You may also enjoy
Chocolate Zucchini Bread
Greek Pasta Salad
Tuesday, August 20, 2013
Peanut Butter Hummus
So I've had a busy couple of days doing some blog planing. For starters I cleared the wipe-board that hadn't been used for over a year in the old office. Want to know an easy secret to cleaning an old wipe-board? Hand sanitizer. Yup I put a little bit on there and it was as clean as new. I then mapped out the next 8 weeks of blog posts... Crazy huh! Trust me there are lots of fun weeks coming up. Then I created a facebook page and a pinterest page for Laura's Baking Talent.
I have been posting on my personal pages all along, but I'm getting more interest so decided to branch out and give the blog its own facebook and pinterest pages. I learned a lot setting up a facebook page for a business :) Still learning the quirks. You can follow both the facebook page and the pinterest page with the social media icons I added to the upper right corner of the page. I found them and embedded them with html code. Sound fancy? I'm impressed with myself. Especially since I didn't even know the term social media icon before I started. So was Jim when he saw the code. He is the computer mastermind around here not me :)
I have plans for a few more fun additions to the blog, but you will have to wait and see them as they come :)
Now on to peanut butter hummus, because that is really what you want to know about right. So I have to admit that when making hummus for the first time there is one SCARY ingredient that you have to get. Tahini.... I mean exactly what is tahini. Exactly?
Trust me Tahini really is ok. I buy it a couple of times of year and use it all the time for hummus... and the recipe from Sunday and the one that will be posted on Thursday use it and they taste super awesome. However I found this peanut butter hummus recipe.. and it uses peanut butter instead of tahini. I love peanut butter, I know it, I have bonded with it since I was a child. It is a best friend. So if you want to try hummus for the first time, and don't want to get tahini... this is the recipe to try. Plus its yummy... Its good with vegetables and pretzels.. and pretty much anything....
Ingredients
1 can chickpeas (aka garbanzo beans)
1/2 clove garlic (chopped)
2 Tbsp olive oil
3 Tbsp peanut butter
1.5 Tbsp lemon juice
1/2 tsp salt
1 tsp ground cumin
2.5 Tbsp greek yogart
2 Tbsp peanuts
Chop up the garlic before putting it into the food processor. Add all the ingredients to the food processor order doesn't really matter. Just make sure and add the chickpeas, garlic, olive oil, peanut butter, lemon juice, salt, cumin, greek yogurt and peanuts.
Pulse for 7-8 time, or until the hummus gets to be the texture that you want it to be. This hummus will be thicker than a hummus made with tahini.
Place on a tray with veggies, pretzels, or crackers. Enjoy!
This recipe was adapted from one on Nigella's website.
If you like this you may also enjoy
Peanut Butter Bomb Smoothie
Reese Puff Treats
Sunday, August 18, 2013
Cucumber Hummus
So I'm going healthy this week... you can either love me or hate me :) Its hummus week. Yup that is right hummus. Ok... wait a minute before you disappear. At least hear me out here. A few years ago picky Laura had never tried and probably would have wrinkled her nose at hummus. I mean seriously what is hummus.
However I was at a party at a friends house. I'm not sure what the party was for now. However they had hummus and I tried it. I actually didn't know it was hummus when I tried it. It just looked good and I got some and tried it. When I loved it, I asked the host what it was and she told me hummus. Really? It was like a trick that someone plays on you to try something you know you will not like.
So I went home to tell Jim that I now loved hummus. He was amazed and excited. In general he is a lot more adventurous and a lot more healthy then me. So hummus was right up his alley.
I started buying it at the store when it was on sale BOGO deals etc. It is kinda of expensive and honestly I am just a sale kind of girl. When we got the idea that we could make it ourselves and try out lots of different flavors.
So now we make our own hummus. It is a regular staple in our lunches. Yum! I started out with cucumber hummus, since at least here in Michigan cucumbers are growing almost as much as zucchini in the gardens.
Ingredients
1 clove garlic
1/4 cup tahini paste
3 Tbsp lemon juice
1 tsp extra virgin olive oil
1 can chickpeas (aka garbanzo beans)
1 cucumber, chopped
salt and pepper, to taste
paprika to decorate
Start up by chopping the clove of garlic as much as you can before putting it into the food processor. Once that is complete add it to the food processor. Then add the tahini paste, lemon juice, olive oil, chickpeas, and cucumber.
Pulse the food processor till the hummus gets to the texture that you want. I did about 6 pulses. Then add the salt and pepper. I sprinkled salt and pepper around the center of the blade twice for both the salt and pepper. I know this isn't exact but its a little more direction then to taste :)
Pulse a few more times to integrate the salt and pepper.
If you are ready to serve put in a bowl and sprinkle with paprika. If not put in the fridge and add the paprika when you get ready to serve later.
I like to pack it with two different types of chips for my lunch. That way there is a little bit of variety and some different flavors.
So dip a chip and enjoy!
This recipe was adapted from the allrecipes website.
If you liked this recipe you may also like
Greek Coliseum Dogs
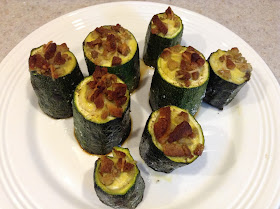
Zucchini Cups
Thursday, August 15, 2013
Traditional Banana Split
We still have a couple more weeks of summer, well at least that is what the calender says. The weather doesn't seem to be agreeing though. We went to the fair on Tuesday and it was cold. I wore capris and a short sleeve shirt, because it was summer and I was going to the fair. I really needed jeans and a sweatshirt.
We still had a great time though. We got to check out the girl's projects and animals. My youngest niece got an honorable mention on her woodworking project. It was fun to see her so excited about it. We also ate the ever anticipated corndogs and a deep batter fried piece of cheese. Yes I ate fried cheese... and you know what it was good. I will probably need to take 10 extra walks this week to work it off :)
Well also checked out all the RVs that they had on display. We love to see the different configurations and say who will sleep where. What are some of your favorite things to do at the fair?
So today we are doing traditional banana splits. Enjoy!
Ingrediants
1 Banana
3 scoops ice cream
3-4 strawberries, mashed
1/8 cup crushed pineapple
chocolate syrup
3 scoops whipped cream
Sprinkles, lots
3 maraschino cherries
Start with an empty banana split bowl... this isn't necessary, but fun!
Add the ice cream
Peel and cut the banana in half and add it to the ice cream.
Take 3-4 strawberries and mash them with a potato masher. Top over one scoop of ice cream.
Top another scoop of ice cream with the crushed pineapple.
Decorate the third scoop with chocolate syrup.
Add the scoops of whipped cream.
Sprinkle with sprinkles, lots and lots of sprinkles!
Add the cherries!
Eat and Enjoy! Isn't this the best dessert you don't have to wait for anything to cool :)
This post originally appeared on Laura's Baking Talent.
If you enjoyed this recipe you may also enjoy
Firecracker Cake
Spiced Up Campfire Smores
Tuesday, August 13, 2013
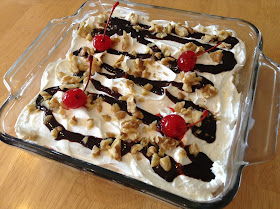
No - Bake Banana Split Dessert
So today's recipe is the whole start or creation around banana split week. I saw this recipe around Easter and it has been the in the back of my mind ever since. Trust me it did not disappoint. I made this recipe when Jim was not home. So basically this means I made it secretly with the music blaring in the kitchen. Do you listen to music when you bake? I love it...
When I said I had dessert for dinner Jim wasn't overly surprised. I mean hello people I run a baking blog. He would probably be more surprised if I said I didn't have any dessert. I pulled this out and was like Surprise.. next week is banana split week and he was surprised! The look on his face was priceless. I love surprises especially good ones like banana split desserts :)
So we are going to the local county fair tonight. My nieces show rabbits, chickens and do a few of the crafts. Evidently this year they did a scarecrow that looks like a minon. It took some explaining to me that a minon is one of the little yellow people from despicable me.
It will be good to see all their projects and how they did.. and of coarse have my favorite fair treat. A corn dog... Yum! I purposely had a small lunch and no "snacks" to save room for my corn dog. Good thing there isn't anymore of this dessert in the fridge because it would surely be tempting me.
Ingredients
For the Base Layer:
1 cups graham cracker crumbs (about 6 crackers)
1/4 cup unsalted butter, melted
For the Cream Cheese Layer:
6 ozs cream cheese, softened
1/8 cup sugar
4 ozs whipped topping
For the Remaining Toppings:
2 bananas, sliced
10 oz (1/2 can) crushed pineapple, drained well
6-8 strawberries, sliced
4 ozs whipped topping
1/4 cup walnuts, chopped
Chocolate syrup
Maraschino cherries
Grease a 9X9 pan, and make room for it in the refrigerator.
Chop up the graham crackers in your food processor. Mix with the melted butter with the graham crackers until they are fully coated. Press the mixture into the bottom of the dish. Put this layer in the fridge while you make the cream cheese filling.
In a medium size bowl mix together the cream cheese and sugar. It will be easier if the cream cheese is softer. I left mine out on the table for awhile, but you could also put it in the microwave for 10-15 seconds. Beat the sugar and cream cheese until it is light and fluffy. Add the whipped cream into the mixture and mix with a wooden spoon. When evenly combined spread on the graham cracker crust layer.
Add the sliced up bananas.
Add the pineapples, make sure and drain them well!
Don't forget the strawberries, that you cut up! So many fruits this means its really good for you right :)
Add the remaining whipped cream, decorate with the chocolate syrup, and top with the cherries.
Put in the fridge to cool for at least 4 hours... Once out of the fridge cut a piece and enjoy!
This recipe originally appeared on the brown eyed baker.
If you enjoyed this you may also enjoy
Traditional Strawberry Shortcake
Smore Cookie Bars






.JPG)






.JPG)